Bathroom design

Bathroom design
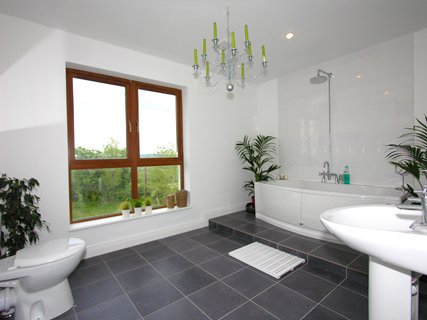
The bathroom should be a place in which you can feel at peace and relax. In a lot of homes, it seems that the original designers squeezed the bathroom into the smallest possible space - as if they considered it a necessary evil. You may be lucky enough to be designing a new home, an extension to include a bathroom or upgrading a property which has never had the proper facilities. Any of these allow you to greatly influence the size and layout of the bathroom in your home. Even if you are remodelling an existing bathroom and are restricted to the physical size of the room, you may be able to work wonders.

Basic Bath Considerations

Bathroom with windowIf you’ve ever wondered why many bathrooms are back-to-back or why professionals tell you to avoid moving fixtures, it’s because of all the plumbing and mechanical systems you can’t see.

“Back-of-the-wall” systems include various pipes to bring fresh water into the room, pipes to bring hot water from your hot-water heater, pipes to carry away wastewater, more pipes to carry away waste, vent stacks to keep pressure equalized and to prevent sewer gasses from entering the house, and on and on.


Even if your bath is on the third floor of your house, its systems have to route up to the roof and down to the systems buried in your lawn on the ground level. Bottom line: The fixtures are just the end point of an entire system.


If you really want to know about all this in detail, the information is available. If not, simply respect that the system is complex, and be aware that your installers not only need to solve whatever problems they encounter in your individual house, but they also need to solve it within the confines of rigorous building codes designed to safeguard your family’s health and your home’s safe function. Your understanding can help you get the best job possible from your installers.


If you’re remodelling an existing bath, you’ll have to decide whether you want to incur the expense of moving basic fixtures and changing the basic layout. If the existing bath layout really bothers you or is unworkable, your top priority may be to relocate fixtures.

Sample Bath remodelling

1. One large bathroom with all fixtures in one room

Bathroom remodelling
2. Batroom with separate Toilet room.
Bathroom remodelling
3. Bathroom with separate Shower room and Toilet room

Bathroom remodelling 3

What’s important is that you understand that this is much more complex than, say, moving a king-size bed from one wall of your bedroom to another!
Virtually every bathroom uses one of the following three basic layouts:


• One-wall layout. One-wall baths have the toilet, sink, and combination shower/tub plumbing aligned along one wall, making for a relatively long, narrow bathroom. One-wall layouts are often used where the simplest solution is to cut off the “end” of a long room and dedicate it to bath fixtures. This layout is also frequently used for powder room or half bath layouts. You may find extra fixtures, such as a bidet, a separate tub, and a separate shower in a one-wall bath, but it’s not common.


• Two-wall layout. Two-wall baths usually have the toilet and sink on one wall and the shower/tub combo (or separate shower and tub) on the other. You might also find the toilet and bidet on one wall and the shower/tub and the sink on the other, depending on the length of each wall. A two-wall layout offers a desirable sense of enclosure, but care must be taken to ensure that fixtures are placed far enough from each other and from the door for safety and comfortable use.


• Three-wall layout. A three-wall layout, with the toilet on one wall, sink on another, and combination shower/tub on the third, is a space-conserving solution that can put every fixture within a step of the others. It’s also the layout you’re likely to see in a master bath with numerous extra fixtures such as a bidet, more than one sink, and a separate tub and shower. If you are remodeling an old bath and want to install a number of new upgrades, a room that’s already plumbed in the three-wall layout may be the easiest to work with.

Planning your bathroom layout:

Small Bathroom - good used spaceDesigning a new bathroom layout - remember there are no absolute rules, after all it is your bathroom.
First of all, list items you want included in your bathroom suite, these are the most likely ones you will want to include.

  • Bath and/or shower
  • Hand basin
  • WC.
  • Bidet

Then decide on other fixings you may want:

  • Electric shaver point
  • Mirror (with over light ?)
  • Extractor fan
  • Bathroom cabinet
  • Medicine chest
  • Laundry basket
  • A chair or stool
  • Shelves

Using Color, Texture and Space

Everything in your bathroom includes design elements that can be used to achieve balance, rhythm, and emphasis. These elements occur naturally together, so it may take a bit of practice to see them. Once you do, you’ll be able to make the often small corrections that give your bath maximum eye appeal.

Color

Color is the most compelling element. Whole books have been written on how to use color, but a few basic techniques are worth noting here.

Choosing tiles for floors and walls that co-ordinate but don’t match will give you a more relaxed look. For best effect, buy them together from the same supplier so you can match the tones.


Light colors reflect light and make a space or an object look larger and airier; dark colors absorb light and make them look smaller and denser.

Contrasting colors stop the eye, breaking up space and making it look smaller. The same or similar colors across surfaces allow the eye to keep moving and unify a space, making the whole area look larger.

Warm colors, such as red, orange, or yellow, reflect light and advance toward the viewer, making the item or wall seem closer and larger. The same goes for pastel versions of these tones — pink, coral, peach, and cream — but the effect is modified by how much white is in the mix. Pale pink won’t come at you the way hot pink will, but it still imparts a sense of warmth.


Cool colors like blue, green, and violet absorb light and recede from the viewer, making the item or wall seem farther away and smaller.

To maximize a sense of spaciousness and repose in the bath, you might opt for a scheme of light colors accented by cool colors in pastel strengths to keep the contrasts low. However, many people prefer pastel tones of warmer colors — blush tones, for example — for their complexion-enhancing qualities. And some prefer to go with, rather than against, a bath’s small dimensions by using dark, rich colors for maximum coziness. The choice is yours!


When you want to draw attention to special features or just create a sense of visual excitement in a room, call on bright, advancing colors to do the job.
If your bathroom includes a window, keep in mind the room’s exposure to the sun. Light from the north and the east is cool, with light rays coming from the blue end of the spectrum. South and west light is warm because the sun’s rays come from the red end.

Color Scheming

Light colors make a space look largerTo understand color relationships, imagine a color wheel with colors appearing in this order: red, red-orange, orange, yellow-orange, yellow, yellow-green, green, blue-green, blue, blue-violet, violet, red-violet, and back to red. This is the order in which colors appear in a rainbow. Tints of colors are made by adding white (e.g., red-orange plus white gives us coral). Shades of colors are made by adding black (e.g., blue-green plus black creates teal). This information comes in handy when you’re trying to create a scheme of colors that look well together.


A pure white bath looks clean, airy, and spacious because white or very pale colors reflect light, visually expanding the room. It’s especially useful for small-space baths

Line and Shape

Free standing bathLine and shape occur in the bath as design elements that affect how the room appears. For example, the vertical lines of wall cabinets, windows, the shower stall, and doors can make a room look taller; horizontal lines in the edges of the vanity and tub can make it look broader. Floor tiles contribute to line as well: Tiles laid diagonally make the floor appear larger than those laid parallel to the walls.

Space and Form

Space and form are the architect’s tools for creating balance in the largest sense of the word. Space, or voids, have a real presence; they are not just the absence of form and are especially important when creating asymmetrical balance. In the bath, you’ll immediately sense when space and form are out of whack (e.g., when all fixtures are on one wall with no balancing cabinetry or area of interest on the opposite wall).


Form includes mass as well as shape that you can modify with visual techniques. For instance, a small bath with a conventional shower/tub combo looks even more cramped with a busily patterned, dark-colored shower curtain, no matter how pretty, taking up most of one wall. Replace it with a clear liner or a glass door, and the mass recedes to the far shower wall. By the same token, white cabinets look less massive than cabinets of the same dimension in natural oak.


Most people feel more comfortable when the largest eye-level masses in a room are not blocking their line of sight into the room. A shower stall or tub set behind the door or on the opposite wall will make a bath look larger than that same form set close to the entryway. A sink, even one in a vanity, is below eye level, so it may work nicely along the right side of a room near the door. Toilets are an exception, although their profile is low. If you’d like the toilet out of sight, screen or enclose it with a full- or half-height partition out of the line of sight of the entryway. It’s the mass of the partition, not the toilet, that then determines its placement in the room.


Suppose your budget won’t allow moving fixtures to the most visually appropriate walls. Use the visual techniques of color and line to make a mass appear less or more prominent and to achieve balance. As long as you make sure they reflect something attractive, you can use mirrors abundantly in the bath to fool the eye, bring in more light, create a sense of depth, draw attention to a focal point on the opposite wall, and more. Even a modest effort will yield big results!


Choosing bathroom fixtures / decorations

The colour and style of a bathroom suite are personal matters but:

  • Think twice before selecting exotic colours or exaggerated shapes; you could tire of them in a very short time.
  • Often colours come and go in fashion (and availability), and the exact same colour may not be available from different manufacturers.

By choosing standard white as the suite colour:

  • you can almost guarantee that you will be able to find a suitable replacement for any item needing replacement in future.
  • you will be able to select different items from different manufacturers - remember, while complete suites are often promoted, you can purchase each item separate if you require.

Ceramic tiles and bathroom firxtures manufactors in Bulgaria:

Get A Proper Job Done

The thing to remember about a bathroom is that you really can’t do it yourself. Plumbing, tiling and electrics all require professional expertise, and that costs money. A bathroom comes close to a kitchen in terms of expense and inconvenience.

Get A Good Builder

Consult a builder early on in the project, so you can gauge how realistic your plans are. Bespoke bathrooms require the services of a qualified builder. A reputable builder will have an electrician to install lighting, a hot water boiler, and any heating, a plumber to install water and drainage pipes and finally a skilled builder to do the tiling of your bathroom.


Builder in Bulgaria - Contact You can contact us if you are looking for a Builder in Bulgaria. We are general builders covering all aspects of construction including Property Renovation, Repairs and Property finishes in Bulgaria. Click here to >> Contact us <<


People reading this were also interested in:


Tags: ,

How to choose the right type of paint

Painting in BulgariaHow to choose the right paint for your needs? Good products are easy to work with, they are applied quickly, do not fade in time, they are easy to clean and have no damaging components. Paints for different premises are of same base but they differ by their additional components – latex, Teflon, silicone, etc.
Types of paints

Alkyd paintGenerally there are two types of paints. Alkyd (oil) paint engraves the walls and for that reason it is rarely used. It is suitable for painting wood, metal and plastic. In the near past the alkyd paint has been widely in use for painting bathrooms. But soon after it was applied the walls started to peel. There was nothing wrong with the paint, it was just wrongly applied. According to some specialists the walls do not let the water through but due to the difference in the temperatures inside the premise, dampness is being formed behind the paints and this is why the alkyd painted walls peel and fall down. In this case a breeding paint is the best option than the alkyd one.

Ordinary polymer paints are most popular. Not many people know they are all breeding and the appearance of condense and mould depends on good insulation, joinery, primer and the quality of paints has nothing to do with it. There is a variety of ordinary polymer paints depending on their components – acryl, latex, vinyl, Teflon, silicone, silicate, etc. You can find on the market paints different in composition and quality. For example it is known that Teflon paint repels the dirt and silicone paint - water. In this sense, the first are recommended for kitchens and for smoky premises while the second are suitable for wet premises. Latex paints have rubber effect that make them flexible, they keep the microorganisms away and are easy to clean. They are ideal for corridors and vestibules. Silicate paints are preferred for walls that are under high moisture influence because of their air- and vapor- permeability. Besides they prevent the walls from the microorganisms. Vinyl paints are fire-resistant.

PaintAccording to their components, polymer paints can be mat, satin and brilliant. Usually mat paint is used for ceilings, while satin and brilliant paint –for walls. Experts advise that mat paint becomes dirty easier but it covers and hides defects of the surface when applied very well. Satin paint is suitable for the living room and the brilliant paint – for kitchens and bathrooms.

Primer – the key for good painting

Brushes and RollersApplying prime on the wall before painting it is a must. In practice, after the ground coat is applied, the surface needs to be cleaned from the dust and then a very thin paint should be applied on the wall. The lack of primer could ruin the ground coat. Water goes into the wall and the fragments of the paint stay on the surface. Thus the dust is being fixed but the base is not allowed to soak equally say the experts. Primer main purpose is to provide perfectly smooth surface before applying the paint. Moreover when applied prime saves the quantity of paint that is being used.

PrimerColorless primes that penetrate deep into the surface are often used. Experts do not recommend their usage because they fix dust and make the surface evenly soaked but small defects are still there. Instead they advise to use white deep penetrating primer that is like paint. Impregnated prime is also good. It penetrates and secures the wall. Be aware impregnated primer has to be washy enough otherwise it can form a glossy cover and painting will be very difficult. So it is advisable to read the instructions from the producer very carefully before applying the prime.

Synthetic based primer is suitable for walls raising problems such as iron in the wall, appearance of rust and also in public places where smoking is allowed and the walls are usually covered with nicotine. Experts recommend that non corrosion primer needs to be applied before metal painting and deep penetrating primer – before wood painting.

Wall painting and re-painting

Wall PaintingIt is very important to make yourself sure that the walls and the ceilings are ready for painting before you start doing this. Their surface should be smooth, clean and dry. Cover the places that will not be painted to protect them clean. If it is well organized painting can be quick and pleasant. Calculate the quantity of paint you will need in accordance with the surface you wish to paint. For example, in order to cover a ceiling with area of 13 sq.m. twice and the expense of paint is 100g/sq.m you will need 2,6 kg. paint. In this case it will be better if you buy 3 kg because these calculations are tentative and it is always good to have more than less.

Take a brush and start paining, cover the corners and the edges of the walls first. Then you can use a roller for painting the rest of the wall more quickly. Try to paint only in one direction. Colored paint should be applied twice to achieve deeper color. Each coating is applied only when the previous one is well dried. Usually this will take 2-4 hours depending on the temperature inside the premise. Do not forget that colors become darker after drying. If there are drops of paint outside the surface you paint, wash them with tepid water immediately. For wet premises choose suitable sanitary latex. If for one reason or another you have to stop painting, dip the brushes and the roller into some water.

When re-painting old walls, primer should be applied first and then the new paint. If you save applying it the second coating can not stick firmly to the wall and it is quite possible that the plaster falls down. Very often in this case small balloons appear on the surface and they may stay on the wall after the paint dries.

The variety of decorative plaster

Decorative plasterDecorative plaster should be chosen according to its structure and properties. One of the latest trends is the widely spread usage of exterior plaster for interior decoration. Experts advise that strong plaster with sandy effect can be used for corridors and vestibules. Being very firm in structure it can hardly be destroyed and it can be washed and cleaned. For internal stairs plaster with rough relief is very suitable. This effect can be achieved by applying coarse plaster and then the paint is laid.

Experts recommend using light, smooth plaster for bedrooms because it is easy to maintain and it does not require regularly cleaning. Plaster with fabric effect brings comfort and this is why this type is much preferred for bedrooms. The “fabric” effect is achieved by applying the first coating vertically and the second one horizontally. Shiny coatings that look like marble are very fashionable these days. Dark, graphitic colors are much sought.

Interior decoratingOne of the latest trends in the interior decoration of a living room is the animal patterns. Valpaint, one of leading companies for decorative coatings in Italy has launched own limited line of decorative plaster with animal patterns. It is called “Jungle” and it offers coatings that imitate animal skin.
All types of decorative plasters are resistant against chemicals. Brush, sponge, piece of cloth, etc. are suitable for cleaning the plaster.
Generally decorative plaster can be applied on different surfaces such as wood, glass, light alloy, metals and PVC. They do not fade in color but if ruined, they are difficult to fix.

List of Bulgarian paint producers:


Builder in Bulgaria - Contact You can contact us if you are looking for a Builder in Bulgaria. We are general builders covering all aspects of construction including Property Renovation, Repairs and Property finishes in Bulgaria. Click here to >> Contact us <<


People reading this were also interested in:


Tags:

Building drywalls with plasterboard

In our previous posts we have written about how to find the perfect building plot in Bulgaria and tabout of the lack of drainange system in the Bulgarian villages.

Building with plasterboardsIn this post we will show you how to use plasterboards to build separating walls in your property in need of renovation (see potential of renovation). Plasterboard provides insulation, fire protection, can be painted, wall papered, drilled, and more.

There are a few types of plasterboard available in Bulgaria. All are made form aerated gypsum plaster – hence the Bulgarian name “Gypscarten”, and are covered both sides with strong paper. The standard sheet of plasterboard in most merchants in Bulgaria has a grey paper back and ivory colouring on the front facing side. The standard size is 12.5 mm (thickness), although different dimensions are available.

Cutting and fixing plasterboard is simple, even for beginners, and only requires a handful of tools. However, it is best not to undertake it solo, as the boards are heavy yet fragile, and can break in transport or when fitting to walls or more difficulty ceilings.

If you carry plasterboard flat, face up, it is more likely to break, so move it its edge and also store boards this way, leaning slightly vertically, in a dry place. To cut plasterboard, lay the board flat, measure then mark out with a pencil, then score with a blade along a straightedge, or saw it. Make sure the board is supported adequately on wood else is risk breaking. If you making cuts inside the board, e.g. for a light switch, make an initial hole with a drill or jigsaw and cut the shape out with a craft knife.


Sample of a separating drywall
Separating wall made of plasterboard
click on the image for larger view

Plasterboard can be stuck using bonding if you are fixing the boards to a flat wall, or by using screws if you are fitting it on a wall which has been studded out by baton. Special galvanized plasterboard screws should be used, or likewise plasterboard screws can be drilled in, but the fixings should not be driven beyond the strong paper. If you are plaster boarding a whole room you should always start with the ceiling, which is incidentally the hardest as you will be working above your head. When it comes to walls, either work away from a corner, or away from a doorway, fitting board by board vertically. Using a chock of wood to raise the board from the floor so that it joins the ceiling, hold the board in place and fix it using of the fore mentioned methods. Any irregular cuts, including above doors or windows or in corners should be measured carefully to ensure the minimum gap is left. Be sure to pencil out where lights or switches will be, and mark where wires run down the wall to prevent drilling through anything vital. Once the whole room is boarded, the boards need to be finished to disguise seams and joins, and also neaten corners and curves pre decoration. This can be done topically with filler or by plastering or lightly skimming the area.

Step one of building a drywallStep two of building a drywall made of plasterboard

If you are going to fill the plasterboard, first disguise nails and screws by applying a layer of filler over the head before waiting for it to dry so you can sand the patch to blend. It may need filling and sanding several times if the filler “sinks” into the hole. To fill joins, whether you have a square edge or a tapered edge, you should always run square-meshed tape called scrim tape, along the join or internal edge. Then press filler into the tape so gaps between joins are filled, then with run filler over the length of the tape into the squares.

Step three of building a drywallStep four of building a drywall made of plasterboard

After the first fill has dried, apply more filler to hide the tape completely, feathering out edges to blend. This is easier when you are filling a tapered edge the rivet is designed to hide the join and the tape once a coat is in place. Again, you may need to fill and sand a couple of times in order to get a smooth join. To check the gap filled between the two boards are level, lat a trowel on one board and check it levels to the other board. If there is a dip or a rise between the boards, put a little filler on the trowel and run it width ways down the strip. On external corners, get metal beading, around 30 st. per metre, and cut to size, ensuring to cut angles where beading meets other beading, e.g. round a window. Put filler on both edges of the external corner, the affix beading.

Step five of building a drywallStep six of building a drywall made of plasterboard

Run more filler down the sides, then leave to dry in place. After sanding, apply more filler with a plastering trowel from the edge of the beading, outwards to the wall, in order to get straight finish. Where the applied filler finishes, feather the edges out using a barely damped sponge, so that he end blend where the filler meets plasterboard is neat. If you are finishing the plasterboard with plaster, you still need to apply a tape and beading to joins and corners, but do not need to apply filler first, although some extra plaster or cement should be pressed into the joins so the finished plaster does not “sink” in. Be aware though, plastering is a tricky art to master and you may end up having to sand bumps and fill dips anyway.

After sanding in preparation for paint or paper, all surfaces need to be swept down, and wiped over with a barely damped sponge. You may need to do this a couple of times before the surface is dust free. If you have gone for the filling option, there is still one more stage before you can directly decorate on the surface of plasterboard. A coat of sealer or primer needs to be painted on the boards to provide a sound surface for decorative treatments, and also to protect the board when wallpaper is steam-stripped.

Plasterboard - redy to paint

The plasterboard is then ready to paint or paper, and any other finishes such as skirting, switches and lights can be added.


We reccommend using KNAUF platerboards only for your building project. Knaus is the leading manufacturer of drywall building systems: www.knaufdrywall.co.uk


Builder in Bulgaria - Contact You can contact us if you are looking for a Builder in Bulgaria. We are general builders covering all aspects of construction including Property Renovation, Repairs and Property finishes in Bulgaria. Click here to >> Contact us <<


People reading this were also interested in:


Tags: ,

Drainage in Bulgarian Villages

(No) Drainage in Villages?

Septic tankWhile the drainage facilities in the Bulgarian cities and towns are well developed things doesnt look like this in most Bulgarian villages. The developemnt of the Bulgarian village has had little to zero priority in developing during the old regime that is why there are many places where there are no underground drains and rainwater is left to soak away. Drainage problems will not always manifest themselves immediately; rainwater will slowly erode the fabric of your house and problems may not become apparent until damp patches starts to appear. Failure to tackle your drainage issues can result in costly remedial measures, which could have been avoided through diligent planning in the first instance.

Observe the Lie of the Land

Many people fail to take note of the land their property sits on. It is vital that you observe the landscape surrounding your plot.

If your house is built on a slope or incline, rainwater will run off from higher ground and engulf or maybe even flood portions of your house. If your home is adjacent to or traversed by a stream, it may overflow during periods of heavy rainfall. If your home is located in a flood plain then adequate drainage should be your first priority.

If you do not know the area well, it is wise to talk with your neighbours to determine if there have been any instances of high water or an excessive surplus of water in periods of extensive rainfall.

Many houses are built on soil instead of solid rock. Soil types vary from region to region and even within a 5-acre area. You need to determine if the soil is stable, especially if you intend to build on a hillside. Some soils do not absorb water very well and this could present big problems when building your septic tank.

The Septic Tank

Septic TankSeptic tank is an alien concept to all who have been used to flushing the loo and leaving the rest to the council! Bulgaria does not have a national waste management system and it is left to the individual property owners in the Bulgarian villages to take responsible for all waste and water flushed through their household drainage pipes. It is therefore essential that you ensure your property has an adequate sized underground septic tank to hold all of your waste.

A septic tank is a watertight box usually made of pre-cast concrete, concrete blocks, or reinforced fibreglass, which lies below the ground. Access is via a metal hatch above ground. When household waste enters the septic tank several things occur: Lighter-than-water organic solid material floats to the surface and forms a layer of what is commonly called “scum”. Bacteria in the septic tank biologically convert this material to liquid. Inorganic or inert solid materials and the by-products of bacterial digestion sink to the bottom of the tank and form a layer commonly known as “sludge”. Only clear water should exist between the scum and sludge layers. It is this clear water that should overflow into the soil absorption area.

You need to contact either the local water authorities or another private company to empty it on a regular basis. The frequency with which it needs emptying will depend on the size of the tank and the amount of use.

Gutters and Down Pipes

Rain GutterIn heavy rain, a lot of rain falls onto the roof of your house and it is important to allow it to drain away from the house through a reliable gutter system. Gutters should be 100 mm to 112 mm in order to catch the rainfall effectively. The rain then flows into a down pipe, which should be 68-75 mm in diameter. Guttering and down pipes are available in UPVC and in aluminium in Bulgaria.

In most Western European countries, one the rainwater had flowed from the roof into the guttering and down pipe; it would pour into a gulley, which would take the water off into the underground drainage system. However, the lack of drainage in Bulgaria means that you need to consider various alternatives.

At the bottom of the down pipe, a collar can be fitted to point the water away from your property. Many Bulgarian builders neglect to add this vital piece of drainage equipment and failure to do so will result in water seeping into the walls and foundations of your house. This method is adequate, but not the best option. In addition, you must be certain that once the rain has exited the collar it does not pool in close vicinity to your house. It must drain away from the property in order to be effective.

Drainage Trenches

Trench DrainageAnother solution to drainage issues is to build a French drain around your property. This is an in-ground trench that captures groundwater. This form of hidden piping can trap water before it enters your house. You can use the French drain to collect ground water and divert it to a low spot on the land, away from your house.

Building a French drain is relatively simple: dig a trench 15 - 30 cm wide and 15 - 30 cm deep around your house. Line the trench with 10 cm of washed gravel in the bottom of the trench. Then install a 10 cm perforated drain pipe on the bed of gravel. Cover the trench with another 10 cm layer of washed gravel. Place a 10 cm layer of straw on top of this layer of gravel. The straw protects the lower gravel and the drain pipe from being choked with silt or sediment from the soil. Finish the trench by filling it with washed gravel to within 2.5 cm of the top and then cover with soil.

French trenches need not be confined to the area around your house. They can be used to drain water from your garden or drive too.


Builder in Bulgaria - Contact You can contact us if you are looking for a Builder in Bulgaria. We are general builders covering all aspects of construction including Property Renovation, Repairs and Property finishes in Bulgaria. Click here to >> Contact us <<


People reading this were also interested in:


Tags:

Potential of Renovation

Potential of Renovation

Renovation of old property in BulgariaThere are many old properties in the Bulgarian villages that have “lots of potential”. Buyers often have high expectations of what they will get for their money in Bulgaria but after making endless visits to many properties often way out of the budgeted price range, many buyers change their perspective and decide to take on the renovation of an old Bulgarian house with the aim of turning it into a real home with modern comforts.

This article explores ways to help you get the most for your money when looking to renovate and old bulgarian house

Research is the very first and most important step and will pay off later.

There is no risk when buying a property if work together with a trusted and skilled builder. The advantage would be that you end up with a home full of character and old world charm with a hint of modern living combined.

Before Renovation

Renovation beforeBeofore buying a property you should contact a builder in Bulgaria (with a good builder you don’t need a surveyor) to get a full picture of what you are about to undertake. A builder will point out any major structural defects and could save you thousands in the long run. He will be able to furnish you with potentially better layouts or ideas that will enhance the value of your home.

Any builder worth his salt will see major defects in a building and warn you about them early on. He should also be able to see the best and most cost effective way to alter a building

The next step woul be to get in writing an estimate or quotation and a payment plan prior to any work commencing. It is a standard in Bulgaria to pay an amount of the quatation usualy 30 to 50 percent before the renovation begins. No matter how small or large the project in hand do try to use local tradesmen, particularly if you are not doing the work yourself.

When the building work is going on try to make regular visits to the site to ensure the work is going to plan. Between visits to site, your builder should be able to send you updates and photographs by e-mail.

After Renovation

After RenovationThere is great satisfaction in renovating an old house because you end up with a home, which matches your ideas and designs and a space, which really suits you. It may seem like an eternity to wait for your work to be completed, the building work itself would take several months depending on volume, but the pride and fulfillment you experience on the day you move in will be well worth the wait. Probably the best thing about a successful renovation is that you will have a wonderful home with a higher resale value compared with the money you put into the project.

Renovation Rules

If you want the advantages of renovating without the risks, follow our 10 simple rules.

  1. Determine your budget and stick to it. Don’t even start if you cannot afford it.
  2. Don’t underestimate renovation costs. Keep aside an additional 10% contingency budget
  3. Avoid buying on impulse. Take your time looking round the property.
  4. You or your builder should check if there is and an electricity supply, is the water supply sufficient for your needs?
  5. Verify the condition of drainage, particularly if there is a septic tank. If inadequate or non-existent, a new one would be needed (more costs).
  6. Let your builder get a copy of the land registry plan (known as the ’skitsa’) to check that the boundaries are correct and all the buildings are marked
  7. Major repairs - watch out for the condition of the roof and walls
  8. Use common sense - don’t buy an old property that can be renovated just to take it down and build a new house.
  9. Get a builder to check the condition of the property and give you an idea of likely costs
  10. Ask your builder for references. If you don’t like his previous jobs, why should yours look better when finished.

Investconsult Ltd is family run building company based in the city of Bourgas, Bulgaria. We are specialized in renovations and building new homes in the Bourgas area. If you are owning a property in need of renovation in close proximity of Bourgas or planning the purchase of such property you can contact us. We would love to help you!


People reading this were also interested in:


Tags:

The perfect building plot in Bulgaria

Choosing the Perfect Building Plot in Bulgaria

Finding the perfect plot of land in BulgariaNot everyone is ready to take on a renovation project, but if money is tight, then you may decide to consider buying a plot of land and building your Bulgarian dream house. With plots of regulated land costing as little as 10 to 20 Euros a sq m in some areas, then you may find this is the best way forward. Initially, you may decide to just buy the land and wait until finances permit you to start building. This is a safe way to ensure that you don’t overstretch yourself, but can still capitalize on the growing Bulgarian real estate market. There are several things you need to consider when buying a plot of land in Bulgaria. InvestConsult Ltd offers some practical help to assist you in your Bulgarian land purchase.

Location

Location Bulgarian Plot of LandThe first thing to consider is finding the ideal plot for your needs, but before you start setting up a viewing trip, you need to do a little research. Consider first the location you want to buy in. Are you looking for sea views, flat open plains or a mountain landscape? Is the plot purely for investment purposes or a place where you intend to build a home for yourself? Do you want to be close to other people or are you looking for a remote retreat? The location of your land will have an impact on the price; the highest land prices are on the coast but if you move 10-20 km to the inland you will find significantly cheaper prices..

Ready to Build

Once you have decided on a location you need to look for regulated land as this means that the plot is suitable for building. It is possible to turn agricultural land into regulated land in some areas but this is something you need to research well before committing to buy. The process of regulating land will cost you time- it takes smething form one up to several years - and of course money. Regulated plots are usually close to mains electricity and water, but this is an aspect that you need to check. The further the distance to the source of these utilities, the greater the cost when you come to build. An isolated plot may offer privacy, tranquility and rural idyll, but you schould think also about the the security of the home which will be impossible if your home is outside of a village.

Proximity to Local Amenities

Local amenities of your home in BulgariaIf you are planning to build a home for your permanent use, then your lands proximity to schools, doctors, the post office and shops is important. If you are intending using your home for holidays, then short drive to the the supermarket through the countryside is fine. Our advise is to look for a plot of land in a village close to a big city in Bulgaria - like Bourgas for example. There are many villages in 20km radius from Bourgas. If you build your home in Bulgaria in such location you will have access to all local amenities of the big city but enjoy the rural life.

Checking Access

If your plot is not located on a street or main road, then you need to check access rights. You may even need to construct a road to your plot and this could prove expensive. If your site is not easy to access, then it will also prove difficult to get materials there once building work commences. If large cement trucks cannot get onto the site then building work will grind to a halt and expenses will rise as you seek alternative methods of delivery.

Boundaries

Check the boundaries of your plotBefore you commit any money to buying your land, you need to check the boundaries in detail. The local municipality will have maps of each plot and will be able to tell you exactly what you will own. There have been many incidents of people being shown a plan of a plot of land only to find that when they own it, it is not the size they originally thought. We can arrange for you surveyors to mark out the plot in question so that you know exactly what you are buying. This will be money well spent. The surveyors will mark the boundary of the plot, once they have taken the necessary readings enabling them to calculate this. Do not assume that existing posts mark out the current boundary before you buy. These are often misleading and boundaries are subject to change as multiple owners carve up large plots.

The Lie of the Land

Sloping plots are much cheaper, but may be difficult to build on and this will add to your costs (but the landscaping of your garden will be unique and beautiful). Furthermore, the type of soil on your potential plot may also affect the cost of your build too. An incline may add a feature to your garden allowing you to add a variety of levels or an infinity pool or permit you to have unobstructed views of the countryside. However you need to determine where you can actually build and you should bear in mind that you will not be able to build closer than three metres to the boundary. This is shown on a plan detailing what is permissible in a local area as well as the size and number of storeys available. Once you are armed with this information, you can stake out the size and position of your home and see if it meets with your needs - in most cases a two storey house is permittet to be build in the villages. This is high enough in 99% of the cases.

Additional Considerations

Building plot in BulgariaYour plot will need to be big enough to include a septic tank. Bulgarian villages do not have common drainage systems and a large underground room has to be built as a septic tank. You will also need another smaller underground room for your water connection and meter. Consider also the location of natural water nearby. Whilst a spring or brook makes an attractive feature, they can prove to be hazardous if they burst their banks and cause extensive flooding. If you are considering building a swimming pool the plot schould be large enough for this too.
The secret to buying the perfect plot is not to rush to pay a deposit, but to research in detail how it best suits your needs and what exactly you are buying. Don’t be pressurized by over-enthusiastic agents who tell you the plot will not be available for long. Remember, should you lose this plot there will always be others.


We can help you finding the perfect building plot in Bulgaria and build your house in Bulgaria. Please don’t hesitate to contact us. We would love to help you!


Tags:

Metric system conversion tables

The metric system is only used in Bulgaria in the building and allied trades. The measurements are normally given in metres, centimetres and millimetres for measurments and in kilogram and tonnes for weights. These measures are inconveniet if you are used to to the Imperial unit system. For our clients from UK we have put together these conversion tables wich hopefully will help you to calculate the building measurments in the system you know better


Length Conversion


Imperial/USA unit Metric (SI) unit   Metric (SI) unit Imperial/USA unit
1 Inch 2.54 centimeters   1 Centimeter 0.39 inches
1 Foot 30.48 centimeters   1 Meter 3.28 feet
1 Yard 0.91 meters   1 Meter 1.09 yards
1 Mile 1.61 kilometers   1 Kilometer 0.62 miles

Weight (or mass) conversion

Imperial/USA unit Metric (SI) unit   Metric (SI) unit

Imperial/USA unit

1 Ounce (weight)

28.35 grams


1 Gram

0.035 ounces

1 Pound

0.45 kilograms


1 Kilogram

2.21 pounds

1 UK ton (2240 pounds)

1.02 metric tons


1 Metric ton (1000 kg.)

0.98 UK tons

1 US ton (2000 pounds)

0.91 metric tons

  1 Metric ton (1000 kg.)

1.10 US tons


Temperature Conversion

  • The freezing point of water in Fahrenheit is 32 degrees, in Celsius it is 0 degrees.
  • The boiling point of water in Fahrenheit is 212 degrees, in Celsius it is 100 degrees.
  • Consequently the difference between freezing and boiling is 180 degrees Fahrenheit (212-32) or 100 degrees Celsius (100-0). This means that 180 degrees change in Fahrenheit is equal to 100 degree change in Celsius, or more simply 1.8 degrees Fahrenheit equals 1.0 degrees Celsius.

This gives rise to the following equations to convert between Celsius and Fahrenheit:

  • °C = (°F - 32) ÷ 1.8        For example: (68°F-32) ÷ 1.8 = (36) ÷ 1.8 = 20°C
  • °F = (°C x 1.8) + 32       For example: (20°C x 1.8) + 32 = (36) + 32  = 68°F  

Some common examples are:

  • Freezing = 0 °C , 32°F
  • Room temperature = 20 °C , 68°F
  • Normal body temperature = 37 °C , 98.6°F
  • A very hot day = 40 °C , 104°F
  • Boiling point of water = 100 °C , 212°F

Area Conversion

Imperial/USA unit   

Metric (SI) unit


Metric (SI) unit

Imperial/USA unit

1 Acre

0.40 hectare


1 Hectare

2.47 acres

1 Square inch

6.45 square centimeters


1 Square centimeter

0.16 square inches

1 Square foot

0.09 square meters


1 Square meter


1 Square yard

0.84 square meters


1 Square meter

1.20 square yards

1 Square mile

2.60 square kilometers


1 Square kilometer

0.39 square miles

1 Cubic foot

0.028 cubic meters


1 Cubic meter

35.23 cubic feet

1 Cubic yard

0.76 cubic meters


1 Cubic meter

1.35 cubic yards

Volume Conversion

Imperial/USA unit

Metric (SI) unit


Metric (SI) unit

Imperial/USA unit

1 Teaspoon (UK)

5.92 milliliters


1 Millilitre

0.17 teaspoons (UK)

1 Teaspoon (US)

4.93 milliliters


0.20 teaspoons (US)

1 Tablespoon (UK)

17.76 milliliters


10 Millilitre

0.56 tablespoons (UK)

1 Tablespoon (US)

14.79 milliliters


0.68 tablespoons (US)

1 Fluid ounce (UK)

28.41 milliliters


100 millilitre

3.52 fluid ounces (UK)

1 Fluid ounce (US)

29.57 milliliters


3.38 fluid ounces (US)

1 Pint (UK)

0.57 liters


1 Litre

1.76 pints (UK)

1 Pint (US)

0.47 liters


2.11 pints (US)

1 Quart (UK)

1.14 liters


0.88 quarts (UK)

1 Quart (US)

0.95 liters


1.06 quarts (US)

1 Gallon (UK)

4.55 liters


0.22 gallon (UK)

1 Gallon (US)

3.79 liters


0.26 gallons (US)

Mileage Conversion

10 l/100km = 28.24 mi/Imperial gal (miles per gallon)

or
40 mi/Imperial gal (miles per gallon) = 7.06 l/100km (litres per 100km)

Building Materials

Material kg per cubic metre
Brick, common red 1922 kg per cubic metre
Cement, Portland 1506 kg per cubic metre
Concrete, Limestone with Portland 2371 kg per cubic metre
Earth, loam, dry, excavated 1249 kg per cubic metre
Earth, wet, excavated 1602 kg per cubic metre
Glass, window 2579 kg per cubic metre
Granite, solid 2691 kg per cubic metre
Granite, broken 1650 kg per cubic metre
Gravel, loose, dry 1522 kg per cubic metre
Gravel, with sand, natural 1922 kg per cubic metre
Gypsum, pulverized 1121 kg per cubic metre
Lime, hydrated 481 kg per cubic metre
Lime, wet or mortar 1540 kg per cubic metre
Mortar, wet 2403 kg per cubic metre
Sand, dry 1602 kg per cubic metre
Sand, wetk 1922 kg per cubic metre
Stone, crushed 1602 kg per cubic metre


You can use this metric calculator to convert every possible measure from one system into every other measure in another system. You will find there a “Length Conversion Calculator” (Millimeters, Centimeters, Meter and Kilometers into Inches, Feet, Yards and Miles), a “Weight Conversion Calculator” (Metric Tons, Kilograms, Pounds, Oz, Grams, Tons), a “Pressure Conversion Calculator” (Bar, Kg/cm, Psi), a “Volume Conversion Calculator” (Milliliters, Liters, Fluid Ounces, Pints, Cups, Quarts, Gallons) and a “Temperature Conversion Calculator” (Celsius, Fahrenheit ). Hope it will be helpful for your building project in Bulgaria.

There are many calculators here too.


Builder in Bulgaria - Contact You can contact us if you are looking for a Builder in Bulgaria. We are general builders covering all aspects of construction including Property Renovation, Repairs and Property finishes in Bulgaria.
Click here to >> Contact us <<

People reading this were also interested in:


Tags: